해당 게시글은 웹을 공부하기 위해 개인적으로 기록했던 자료입니다.
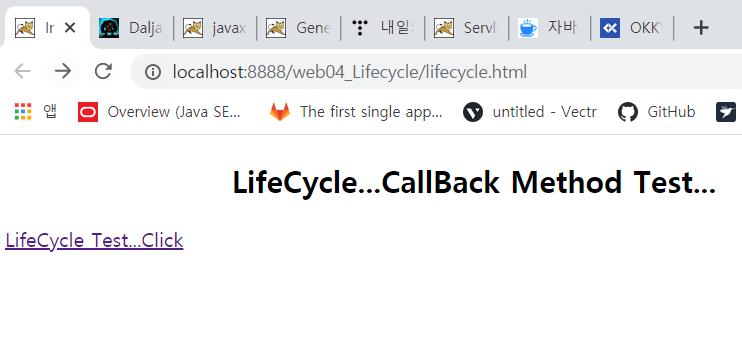
아래와 같이 클릭 후 Servlet이 작동하는 lifecycle.html파일을 작성했습니다.
<!DOCTYPE html>
<html>
<head>
<meta charset="UTF-8">
<title>Insert title here</title>
</head>
<body>
<h2 align="center">LifeCycle...CallBack Method Test...</h2>
<a href="Life">LifeCycle Test...Click</a>
</body>
</html>
당연히 web.xml파일에서 url-pattern이 Life인 코드가 있어야 합니다.
<?xml version="1.0" encoding="UTF-8"?>
<web-app xmlns:xsi="http://www.w3.org/2001/XMLSchema-instance" xmlns="http://java.sun.com/xml/ns/javaee" xsi:schemaLocation="http://java.sun.com/xml/ns/javaee http://java.sun.com/xml/ns/javaee/web-app_2_5.xsd" id="WebApp_ID" version="2.5">
  <display-name>web04_Lifecycle</display-name>
  <welcome-file-list>
    <welcome-file>index.html</welcome-file>
    <welcome-file>index.htm</welcome-file>
    <welcome-file>index.jsp</welcome-file>
    <welcome-file>default.html</welcome-file>
    <welcome-file>default.htm</welcome-file>
    <welcome-file>default.jsp</welcome-file>
  </welcome-file-list>
  <servlet>
    <description></description>
    <display-name>ServletLifeCycleTest1</display-name>
    <servlet-name>ServletLifeCycleTest1</servlet-name>
    <servlet-class>servlet.life.ServletLifeCycleTest1</servlet-class>
    <load-on-startup>1</load-on-startup><!--이걸 안하면 lazy loading상태.   하면 pre loading상태.  -->
  </servlet>
 </web-app>
<load-on-startup>태그는 Server의 loading상태를 설정할 수 있는 태그 입니다. 이 태그 안에는 다른 Servlet instance와 구별되는 숫자가 들어가 있어야 합니다.
WAS의 Life cycle상 서버가 돌아가기 시작함과 동시에 web.xml파일을 읽고 Servlet의 인스턴스들을 생성해야 합니다. 그러나 서버가 작동하고 최초의 요청의 경우에는 서버가 요청이 시작하고 나서부터 web.xml파일을 읽고 Servlet의 인스턴스를 생성합니다. 이를 방지하기 위해 <load-on-startup>태그를 작성합니다.
이 태그를 작성한 상태를 pre loading상태라고 하고 그렇지 않은 상태를 lazy loading상태라고 합니다.
Servlet을 아래와 같이 작성합니다.
package servlet.life;

import java.io.IOException;
import java.io.PrintWriter;

import javax.servlet.ServletConfig;
import javax.servlet.ServletException;
import javax.servlet.http.HttpServlet;
import javax.servlet.http.HttpServletRequest;
import javax.servlet.http.HttpServletResponse;

public class ServletLifeCycleTest1 extends HttpServlet {
	private static final long serialVersionUID = 1L;
	private int count = 0;

    public ServletLifeCycleTest1() {
    	super();
    	System.out.println(this.count+" ServletLifeCycleTest1 constructor....by container");

    }
	public void init() throws ServletException {
		System.out.println(this.count+" ServletLifeCycleTest1 init....by container");
	}

	public void destroy() {
		System.out.println(this.count+" ServletLifeCycleTest1 destroy....by container");
	}

	protected void doProcess(HttpServletRequest request, HttpServletResponse response) throws ServletException, IOException {
		this.count++;
		System.out.println(this.count+" ServletLifeCycleTest1 service....by container");
		response.setContentType("text/html; charset=UTF-8");

		PrintWriter out = response.getWriter();
		out.println("<html><body>");
		out.println("<h2>Success</h2></body></html>");
		out.close();
	}
	protected void doGet(HttpServletRequest request, HttpServletResponse response) throws ServletException, IOException {
		System.out.println("doGet....");
		doProcess(request, response);
	}
	protected void doPost(HttpServletRequest request, HttpServletResponse response) throws ServletException, IOException {
		System.out.println("doPost....");
		doProcess(request, response);
	}

}
기본생성자, init(), destroy(), doProcess(), doGet(), doPost()에 각각 println()메소드를 넣어주고 확인해봅니다.
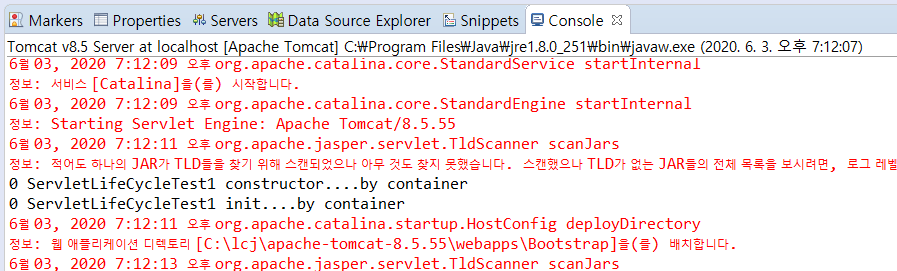
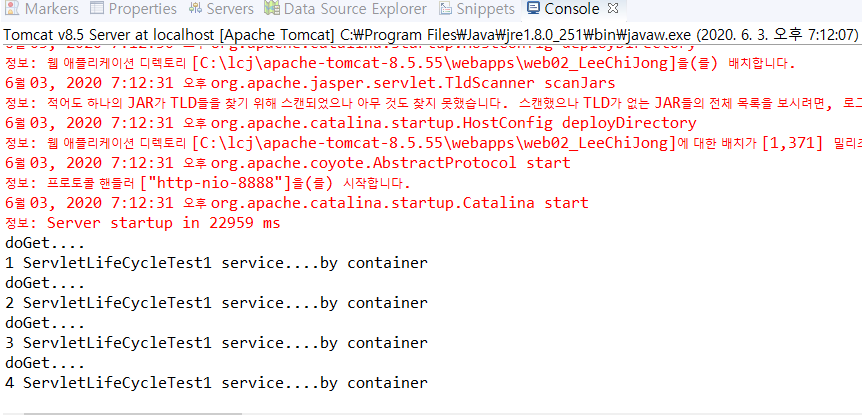
Eclipse에서 Tomcat의 동작 화면을 보면 <load-on-startup>태그를 작성해서 pre loading 상태이기 때문에 중간에 호출하기 전에 생성자를 실행하고 init()메소드를 실행하는 것을 확인할 수 있습니다.
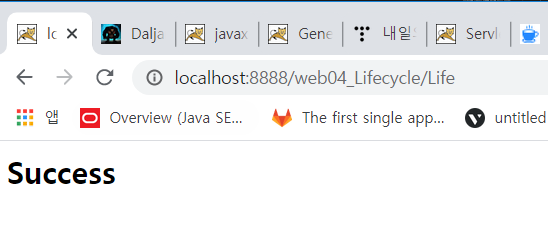
이후 브라우저가 요청을 시작하면 그때 service()를 실행합니다.
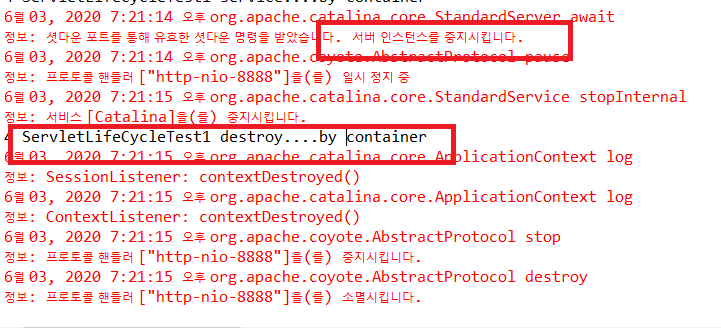
그리고 마지막으로 이클립스에서 Server탭을 눌러 오른쪽에 빨간 네모박스(중지 버튼)을 누르면 destroy() method가 작동되는 것을 확인할 수 있습니다.